Tomorrow we're going to welcome March and maybe some of you can already feel spring in the air.
If you're looking for new inspiration for this season, we have outstanding altered art brought to you by Irina!
Enjoy!
Hello, Irina Honcharyk with you!
The spring is just around the corner! I'm really looking forward to it. This anticipation inspired me to create a special artistic alarm clock to welcome this new season. I think we're all waiting impatiently for the light spring breeze, the sun and of course - the first butterflies! :)
I disassembled an ordinary orange plastic alarm clock and prepared its parts for painting.
First, I painted the alarm clock with Black Gesso to prime it. After it dried, I used Modeling Paste and a Cobblestone stencil. I applied it in an irregular way and waited until it dried.
I prefer not to use a heating tool, when there is time and opportunity I leave my works to air-dry.
I glued all the metal embellishments using 3D Matte Gel which is an excellent adhesive.
As I really love adding wire to my works, I decided to do it here too. I used two different sizes.
And finally, the most charming element of the work! I stamped a butterfly stamp on tracing paper, cut out the shapes and carefully glued them to my alarm clock. I wanted to create the impression of butterflies fluttering over the clock. :)
Here's how the butterflies turned out. I love their delicate, ethereal impression.
as you know, last Monday was Prima's mid-release of my new products! You could see some amazing examples of how to use them creatively - presented by my wonderful Creative Team in this Prima blog post. This is all so exciting!
One of the brand new produtcs is Sculpture Medium and here's my new work created to tell you some more about the possibilities of this new medium.
You see, Sculpture Medium is a very clever trick indeed. ;)
Like its name says, it was designed to let you create all kinds of 3D forms and shapes.
It makes delicate materials (like fabric) hard, permanent and resistant and it's so very easy to use.
In this canvas/assemblage piece of mine, I used the medium to create my background.
As you can see, there are bits of lace and different kinds of fabric that were made hard and ready to work on without worrying that too much water, paint or spray might damage them.
The medium also allowed me to create some really interesting new textures.
The method is so easy - I simply soaked all the materials in the medium (you can use a brush to apply it but make sure you're generous with it), then I arranged them in the way that I liked and left to dry. You can also use a heating tool to speed up the process, but be patient, it might need a little while to dry properly.
When my collage background was finally dry, it was hard and ready to work on with other mediums.
I painted it with Black and White Gesso, glued on all the elements with Heavy Body Gel (foolproof adhesive! ;)) and then added colors with Lindy's Stamp Gang sprays choosing green/blue/turquoises palette as I wanted to recreate a verdigris effect.
I hope you feel inspired to try out my new Sculpture Medium. Let your imagination flow, the possibililties are endless...
If you need more information, visit my Art ExtraVagance Art Files where you can read about the medium and other new products as well.
Also make sure you see this Prima post where you will find crazy beautiful examples by Kasia and Gayle who showed their Sculpture Medium creations!
If you have any questions, please leave a comment and I will be happy to answer.
In this month's edition of our Mixed Media Academy we we'd like to talk to you about mistakes.
We had some really interesting conversations about them in our
Finnabair Creative Team group and we thought we'd share our thoughts
(and art accidents ;) ) with you. :)
We all agreed that mixed-media is one of the most forgiving art fields. It's really liberating when you think of it. There are so many possibilities, mediums and techniques, you can use certain tricks to cover the bits you hate or... pretend you actually meant it that way. ;)
After all, it's just a piece of paper or canvas, keep going, love what you make.
And if you still don't, toss it away and start anew. Most of all, don't give up!
And please remember, like Miles Davis said, -
"Do not fear mistakes. There are none."
Mistakes (or happy accidents if you will) happen to everyone. What true experts do, is they don't let it stop them! Here are our Teamies sharing their personal thoughts and stories. Enjoy! :)
I have a funny story to share with you! When I was
making a video about a layout, while making the background I used a
stamp backwards! Oh yes, I placed the stamp with the design facing the
clear base, lol! So, I had to deal with a pretty big and ugly smudge on
the middle of the page!
First I thought 'what's wrong with this stamp'? I
was pretty sure that I had done all in the right way. But when I
realized what happened, I ended up laughing and feeling a little dumb. :)
Of course I wasn't disappointed and didn't worry. With a little bit of
Heavy White Gesso everything can be fixed and that's why I have it on
my 'must have' list.
It's the easiest thing to do and then you can use
anything on it, like paints and embossing powders like I did.
You can
watch all this fun happening in the video below. If you are interested
to watch the whole layout click here.
For me there are no mistakes in mixed media art. And if any, you should try to make these work for you.
What I normally do, is I try to fix the piece somehow so that I can leave my craft space with happiness in my soul and the second reason why I do that is the super feeling I had not wasted any of my precious scrap materials. ;) Or... you can always pretend the "mistake" was actually intentional. ;)
When it comes to fixing, my magical helpers are Gesso (White & Clear), scissors, time and wet baby wipes.
First I have to say since I love spraying the colors on my projects what sometimes happens are unwanted drops here and there. I´m a bit impatient when creating and have no time and nerves to cover certain areas of my piece to avoid staining. And here comes the first helper – the Gesso.
When I create, I usually start by applying the gesso on my piece. This stops the paper from soaking in too much color and if you happen to make unwanted stains, you can easily wipe them off (when still wet) with a baby wipe. However, this does not work for Ecolines! Another option is to cover your mistake with more gesso.
I love creating mixed media backgrounds but from time to time I find it´s not what I had planned.
I usually give it some time and then work on it. If I still don´t like it, my scissors gets into action.
I realized that what doesn´t work on a big format, may be super cool on a smaller area. So, my second advice is to change the size of your masterpiece.
You know, they say time heals everything and it´s the truth. Remember you should be enjoying yourself when creating. It´s no good to lose your nerves due to a „spoilt“ project. Just relax, put it away, do nothing and just wait for the inspiration to hit you. It may or it may not but who cares... ;) We´re just human and some mistakes are pure beauty!
Well, nothing I make is ever planned, there
is never a preconceived picture of what it will look like finished, so I
guess in a way that means I "can't" make a mistake.
I worked intuitively and I do really believe in art there are no mistakes... Every mark, every colour, can be a thing of beauty to someone.
So just relax, trust yourself, listen to that voice inside you and enjoy the process!
I think stamps are the best thing to hide too much
color (the orange blob) or too much white contrast. (the white strip of
paper)
Here are the before and after shots of using the Bubbles and Notes stamps to add, cover up light area, or break up a mass of color.
The sepia ink adds warmth and the black ink
creates contrast.
This technique doesn't "correct" a problem, it just
"enhances" the process.
No beauty is perfect. Ideal forms are usually the most boring ones. Art which is free from errors and mistakes makes the viewer humbled but doesn’t grab his emotions. Art is giving yourself a permission to make mistakes. They are part of the process and one of the factors which makes your art as unique and true.
I would like to share with you my solution in case of mistakes or little disasters. Some time ago I had one of my journal spreads torn apart. In order to make it look right again, I fixed the page with washi tape. Then I put a generous coat of Heavy White Gesso to cover the line of fixing.
When it became dry, I sprayed it with blue and green Mica Powders mixed with water. To blend it more into the backround, I used a few stamps and black india ink splashes. The spread was repaired and in one piece once again.
When I heard about this month's theme I could not think of an easy answer. Mistakes, how to deal with them, how to cover them up ?
Well...
maybe this will sound strange but I never see mistakes in my
projects... It does not mean I love all of my makes... but certainly I
do not consider happy accidents as mistakes. :)
Instead of
seeing negative in my art I try to turn it into positive. I do not drop a
project and move on to the next one but I keep on creating around what I
have already done.
My best advice: don't stress while
making art, enjoy every single step and learn through the process even if
it's not what you have imagined in the first place... Experiment and
let go!
We are really curious to hear you thoughts!
How do you deal with your art mistakes? Do you have any favorite tricks up your sleeve? ;)
Leave a comment, we'd love to hear from you!
Finn & The Team
A slight change of plans - as you know it's usually Mondays and Fridays when my Creative Team Artists present their projects but last Monday we were celebrating the mid reveal of my new products!
And so it's today that we meet with our lovely Athanasia who created a superb steampunk treat for us all (and her brother :) ). This piece made my heart flutter and you will surely see why (there's a video too!). :) Enjoy!
Hello dear friends!
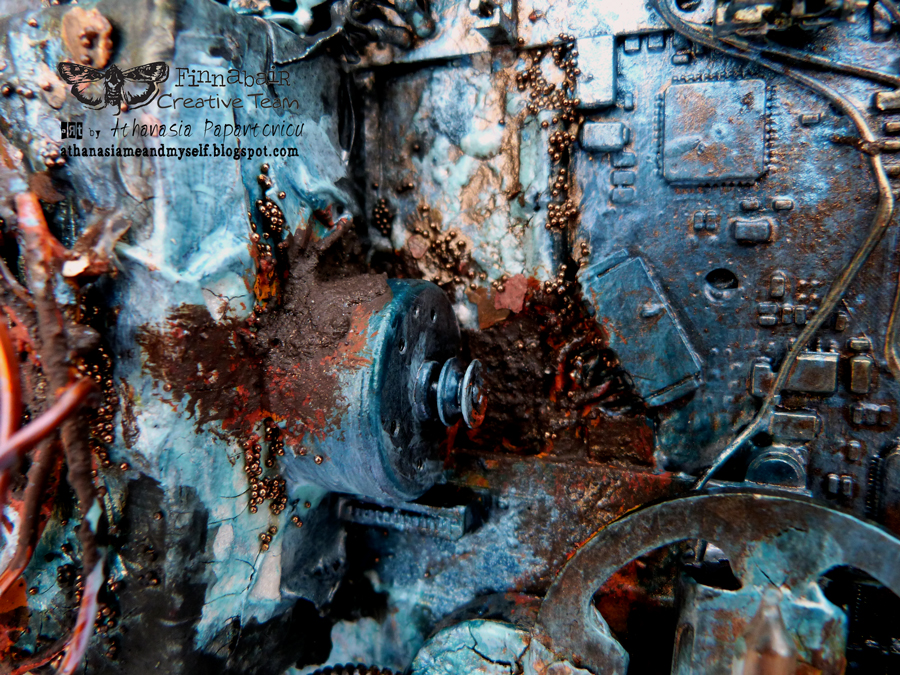
Today I'm sharing an altered wooden case I created for my brother. I haven't given it to him yet, it's a present, actually a surprise, so shhhhhhh... don't tell him anything yet :) He's an electronic and his lab is called '01'.
The Mechanical Numbers are the perfect size to write the name of the lab in the center of the composition. The new Mechanical Rusty and Steampunk gears, the Barn Stars and Mini Hardware were also a perfect match for this project, I just love them there!
I started by gluing electronic plackets (I got them from my dad - he is also an electronic) all over the surface with the new silicone brush 1' and Heavy Body Gel.
This Gel is a very strong glue and I highly recommend it if you need to glue heavy or metal embellishment on your project like I did.
Next step was to cover everything with Black Gesso. It creates a beautiful and interesting base to work on, the paints love it. :)
When it was all dry I used some acrylic paints to color everything: Opal Magic Blue-Gold, Silver Spoon and Light Patina and also Emerald Green, Black Berry and Deep Waters from the new colors.
To add more texture I used the Platinum Crackle Paste here and there and used the same acrylic colors to paint it over when it was dry.
The next step was the most exciting of all the process. I used the new Rust Pastes. I couldn't wait to use them when I first saw this amazing product! I have to tell you, this is my new favorite 'must have'. The rust look is so awesome and feels and looks real! I absolutely adore the result!
Last thing I did was to spread two shades of Mica Powder (Rust and Deep Water) with a paintbrush all over the project. I sprayed some water and dried it with a heat gun. I think this last step was very important because it unified all the colors and textures.
Here are some more details...
You can see the whole process in my video below.
I hope you got some ideas on how to alter wooden or metal embellishments and give them a whole new look!